Even for developers, WordPress blocks can be confusing at the best of times. Throw WooCommerce into the mix, and things get even trickier. I’ve been hanging out in the WooCommerce Community Slack lately, trying to help out where I can, and this question kept cropping up.
How do I integrate my existing payment gateway with the block checkout? I don’t know where to begin.
It’s not a question easily answered over messenger (as the length of this guide goes to show!), so I wanted to lay out the steps I would take — from start to finish — to add block support to an existing payment gateway plugin.
So, rather than do this in a purely hypothetical approach, I thought it would be cool to show some actual practice with a real plugin. If you like, you can follow along with the steps in your own testbed and see how the pieces fit together!
Before we begin, a few caveats to mention.
-
I’ve picked a plugin mostly at random from the WordPress.org repository. Based on its description it seemed simple enough to meet the needs for the tutorial, but I haven’t ever used the plugin, and therefore this isn’t a recommendation to use this plugin. It just suited the purposes of creating some simple blocks to hopefully show you more about the process than the plugin itself.
-
As a quick note, I highly recommend using TypeScript for your frontend code. You’ll have a much better time working with data that has types, avoiding tricky hidden errors, not to mention the added benefit of editor tooling such as intellisense/autocomplete. I’ve not included it in this tutorial though as it can be scary to some who are just getting started, and WooCommerce haven’t made it easy for us 3pd’s to use TS even if they do :upsidedown_face: (_though I’d still recommend it, honestly, you don’t have to use much to get the benefits!)
-
Before we crack on, make sure you’ve got Node and pnpm installed. You can of course use your own preferred node package manager, but the commands below will be using pnpm to keep things simple.
Before we begin
Before diving into the code, let’s quickly discuss the WooCommerce checkout block and what we’re aiming to achieve.
The WooCommerce Cart and Checkout block functions quite a bit differently than the WordPress blocks that you may have read about. Newer WooCommerce blocks, such as the ones they’ve built for the product collection, behave a lot more similarly though.
What this means is that when you’re looking to add blocks for the WooCommerce checkout, such as the payment gateway integration, you really need to rely on the WooCommerce documentation specifically, and not the WordPress block editor docs.
The additional TL;DR here is that the WooCommerce Checkout block is rendered in the frontend1, compared to the WordPress blocks which are mostly server side rendered (in PHP) with only the editor side of things rendered in React.
While WooCommerce has tried to add a compatibility layer to existing hooks and filters in PHP-land, some things are just not going to translate when it gets rendered (and re-rendered) in React-land. So, for the most part, you’ll be dealing with JS/TS for your checkout block integrations!
This also means you may need to delve into the Store API (redux store for session data), and probably touch on the WooCommerce Checkout event flows.
For the rest of this tutorial I will be working with the WooCommerce Custom Payment Gateway. I have never used this plugin before (as noted above), only coming across it searching the wp.org directory for “payment gateway” and looking for a simple sounding one.
While the other gateways may be more complicated and closer to a real payment gateway, the API implementation of the gateway isn’t the interesting part for this article, so this fit perfectly. I also noticed that there was at least one support request in the forum asking for block support where the developer indicated is not yet included. So it ticked all the boxes for our purposes!
Initial setup to start working with our block
Let’s kick things off by setting up a basic app skeleton. This will ensure that the PHP side is loading our script correctly on the block checkout pages and give us an entry point for our new shiny frontend block scripts.
The aim here is just to get the scripts being loaded at block checkout so that we have a solid base to work from for the rest of our integration.
In order to complete this step, we need to:
- add the frontend tooling required to bundle the scripts
- get a dev server running in watch mode (so we don’t have to manually refresh like heathens)
- add the PHP hooks and compatibility settings to declare block support for our gateway
Add the frontend tooling
In the WordPress block world, the go-to tool is wp-scripts, which is basically a handy wrapper around webpack.
It comes with some default config that let’s you hit the ground running. I’d recommend looking into the webpack docs for further configuration options as your needs grow. You can still merge the WP defaults and override them with anything specific to your use case.
Alright, cracks knuckles, let’s get to it!
First up we’ll:
- install the gateway plugin and pop open the directory in our terminal
- run
pnpm initto create a fresh package.json, since our downloaded gateway didn’t come with one - add the
pnpm install -D @wordpress/scripts @woocommerce/dependency-extraction-webpack-pluginpackages too - add some other WordPress dependencies we’ll need:
pnpm install @wordpress/element @wordpress/html-entities @wordpress/i18n - we can add some other quality of life scripts that we’ll be using too as part
of the
scriptsproperty - store our frontend code in the client directory by running
mkdir client/src/and creating ourtouch client/src/app.jsxfile
Once all this is done, your package.json should look like:
{ "name": "woocommerce-other-payment-gateway", "version": "1.0.0", "description": "", "main": "index.js", "scripts": { "dev": "pnpm run start:hot", "start": "wp-scripts start", "start:hot": "wp-scripts start --hot", "build": "wp-scripts build" }, "keywords": [], "author": "", "license": "ISC", "packageManager": "pnpm@9.4.0+sha512.f549b8a52c9d2b8536762f99c0722205efc5af913e77835dbccc3b0b0b2ca9e7dc8022b78062c17291c48e88749c70ce88eb5a74f1fa8c4bf5e18bb46c8bd83a", "devDependencies": { "@woocommerce/dependency-extraction-webpack-plugin": "^3.0.1", "@wordpress/scripts": "^29.0.0" }, "dependencies": { "@wordpress/element": "^6.0.0", "@wordpress/html-entities": "^4.0.0", "@wordpress/i18n": "^5.0.0" "react": "^18.3.1", "react-dom": "^18.3.1" }}Your packageManager line may differ, depending on the version installed at the time you run the command.
Don’t worry about it - you can use whatever pnpm version you like. Once you’ve got that installed and setup, you’re good to go!
Get a dev server running in watch mode
Next, we need to decide what webpack config you need. I would recommend setting up a webpack.config.js file, even if you plan on using the WP defaults, as this lets you override settings later down the line if you need to. It also lets you configure the entry and output paths which makes things easier and allows you to match your own plugin layout.
Will your development environment have SSL certificates enabled? Some gateways may require you to be running under SSL in order to load their SDK scripts, and by default wp-scripts will run in plain non-SSL mode.
It doesn’t matter so much for our purposes here, so the choice is up to you. A lot of free local WP environments provide free self signed certificates you can use though, so it might be good practice to set it up anyway. I’ll provide both example configs, you’ll need to tweak them for your own circumstances.
I’ll be using SSL as my local WP instance is running with self-signed certs, but it shouldn’t matter for the rest of this article. So choose Option A for non-SSL sites, or Option B for the full-kitchen-sink config that supports both 😎
(if you’re unsure here, go with option A, you should only need option B if your gateway or existing site has ssl requirements!)
-
Without needing to take into account SSL, your webpack.config.js can be simplified:
webpack.config.js const defaultConfig = require('@wordpress/scripts/config/webpack.config')const DependencyExtractionWebpackPlugin = require('@woocommerce/dependency-extraction-webpack-plugin')const path = require('path')const fs = require('fs')module.exports = {...defaultConfig,plugins: [...defaultConfig.plugins.filter((plugin) =>plugin.constructor.name !== 'DependencyExtractionWebpackPlugin'),new DependencyExtractionWebpackPlugin()],entry: {'wc-other-payment-gateway': path.resolve(process.cwd(),'client','src','app.jsx')},output: {...defaultConfig.output,chunkFilename: 'wc-other-payment-gateway-block-[name].js',path: path.resolve(process.cwd(), 'dist')}}Specifically, we’re relying on most of the default WordPress config, but making key modifications like:
- filtering out the WordPress extraction plugin so that we can replace it with the WooCommerce version (L55-58)
- setting the entry points for our script and the output path and file name (L64-75)
-
First we need to install the dotenv dependency as we’re going to read in some local variables. We can use these in our config to allow us to keep it a little dynamic without needing to change the config each time in each project we end up using it in.
We’ll also add the clean-webpack-plugin whilst we’re at it.
Terminal window pnpm install -D dotenv @woocommerce/dependency-extraction-webpack-plugin clean-webpack-plugintouch .envYou should make absolutely sure when using .env files that you are not comitting them into version control.
Most template .gitignore files will ignore them by default, but definitely, definitely, do not publish API keys stored in .env files into public repositories unless you want to have a really bad day (or understand why you need them there).
You can always commit
.env.samplefiles instead that explain what variables need setting and the potential values or safe defaults.Shouldn’t matter for the purposes of how we’re using them in this tutorial, but it’s always worth mentioning!
For our purposes let’s fill the .env file with:
.env WEBPACK_ALLOWEDHOSTS=example.com # Domain for your WP instanceWEBPACK_USE_HTTPS=true # Enable HTTPS for local developmentWEBPACK_CA_CERT=path/to/rootCA.crt # Path to CA certWEBPACK_APP_KEY=path/to/server.key # Path to key fileWEBPACK_APP_CERT=path/to/server.crt # Path to cert fileWEBPACK_HOST=localhost # Host of your WP instanceWEBPACK_PORT=8887 # Port for the dev serverNext up, we can use it with a custom webpack.config.js:
webpack.config.js const defaultConfig = require('@wordpress/scripts/config/webpack.config')const DependencyExtractionWebpackPlugin = require('@woocommerce/dependency-extraction-webpack-plugin')const { CleanWebpackPlugin } = require('clean-webpack-plugin')const path = require('path')const fs = require('fs')const dotenv = require('dotenv')dotenv.config({ path: '.env' })module.exports = {...defaultConfig,devServer: {...defaultConfig.devServer,headers: {...defaultConfig.devServer?.headers,'Access-Control-Allow-Origin': '*','Access-Control-Allow-Methods': 'GET, POST, PUT, DELETE, PATCH, OPTIONS','Access-Control-Allow-Headers':'X-Requested-With, content-type, Authorization'},allowedHosts: process.env.WEBPACK_ALLOWEDHOSTS? [...((defaultConfig.devServer &&defaultConfig.devServer.allowedHosts) ||[]),...process.env.WEBPACK_ALLOWEDHOSTS.split(',')]: 'auto',client: {webSocketURL: {protocol: process.env.WEBPACK_USE_HTTPS === 'true' ? 'wss' : 'ws'},overlay: {errors: true,warnings: false,runtimeErrors: false}},server:process.env.WEBPACK_USE_HTTPS === 'true'? {type: 'https',options: {ca: fs.readFileSync(process.env.WEBPACK_CA_CERT),key: fs.readFileSync(process.env.WEBPACK_APP_KEY),cert: fs.readFileSync(process.env.WEBPACK_APP_CERT),requestCert: false}}: defaultConfig.devServer?.server || 'http',host: process.env.WEBPACK_HOST || 'localhost',port: process.env.WEBPACK_PORT || 8887},plugins: [...defaultConfig.plugins.filter((plugin) =>plugin.constructor.name !== 'DependencyExtractionWebpackPlugin'),new DependencyExtractionWebpackPlugin(),new CleanWebpackPlugin({cleanAfterEveryBuildPatterns: ['*.hot-update.*']})],entry: {'wc-other-payment-gateway': path.resolve(process.cwd(),'client','src','app.jsx')},output: {...defaultConfig.output,chunkFilename: 'wc-other-payment-gateway-block-[name].js',path: path.resolve(process.cwd(), 'dist')}}Don’t worry if this looks complicated — it’s mostly boilerplate. Once set up, you can reuse this across projects. 😅
All’s we’re doing here is importing the default WordPress config and spreading it onto our own config object. This let’s us override only the bits we need to, and the rest is taken from WordPress defaults.
Here’s what we’re doing:
- supporting both SSL and non-SSL within the same config, allowing us to turn it
on and off via an
.envfile (L31 and L40) - adding additional config for the
devServerso that we provide CORS headers (L14-20) - also adding an
allowedHostproperty that matches our WP instance (L21-28) - and adjusting the websocketURL depending on if we’re running in SSL mode or not (L30-32)
- telling webpack where to find our SSL cert files. You will need to look up your own certs and provide them in the .env (L40-49)
Finally, in the last secton we:
- filter out the WordPress extraction plugin so that we can replace it with the WooCommerce version (L55-58)
- add the clean webpack plugin to keep our output dir clean when running the dev server for long periods of time (it generates numerous .hot-update. files as you change files while it is running) (L60-62)
- set the entry points for our script and the output path and file name (L64-75)
It feels like a lot, but once you have this down, you can re-use this in all your other projects and just change the entry and output paths!
SSL is a bit tricky, but this setup ensures you’re covered whether your site uses SSL or not.
- supporting both SSL and non-SSL within the same config, allowing us to turn it
on and off via an
Add the PHP hooks and compatibility settings to declare block support
First things first, let’s tell WooCommerce that we support the cart checkout
block. This can be done by hooking into the before_woocommerce_init action.
Luckily, our plugin is already declaring some compatibility on L56 of the
woocommerce-other-payment-gateway class, so let’s add it in there:
add_action( 'before_woocommerce_init', function() { if ( class_exists( \Automattic\WooCommerce\Utilities\FeaturesUtil::class ) ) { \Automattic\WooCommerce\Utilities\FeaturesUtil::declare_compatibility( 'custom_order_tables', __FILE__, true ); \Automattic\WooCommerce\Utilities\FeaturesUtil::declare_compatibility( 'cart_checkout_blocks', __FILE__, true ); }});We also need to register our integration with the WooCommerce block registry. To
do that we need to hook into the woocommerce_blocks_loaded action which we can
do the same file. We’ll add it just below the existing plugins_loaded hooks:
add_action( 'plugins_loaded', 'other_payment_load_plugin_textdomain' );function other_payment_load_plugin_textdomain() { load_plugin_textdomain( 'woocommerce-other-payment-gateway', FALSE, basename( dirname( __FILE__ ) ) . '/languages/' );}
add_action( 'woocommerce_blocks_loaded', 'register_woocommerce_block_integrations' ); function register_woocommerce_block_integrations() { if ( class_exists( 'Automattic\WooCommerce\Blocks\Payments\Integrations\AbstractPaymentMethodType' ) ) { require 'class-woocommerce-other-payment-gateway-blocks-integration.php'; add_action( 'woocommerce_blocks_payment_method_type_registration', function( $payment_method_registry ) { $payment_method_registry->register( new WC_Other_Payment_Gateway_Blocks_Integration ); } ); } }The eagle eyed amongst you probably noticed we’re creating a new instance of a
WC_Other_Payment_Gateway_Blocks_Integration class in the above code, but that
class doesn’t exist in our plugin! So let’s create a new file and get that class
created:
<?php
use Automattic\WooCommerce\Blocks\Payments\Integrations\AbstractPaymentMethodType;use Automattic\WooCommerce\Blocks\Utils\CartCheckoutUtils;
defined( 'ABSPATH' ) or exit;
class WC_Other_Payment_Gateway_Blocks_Integration extends AbstractPaymentMethodType {
// First we implement the abstract methods from the `AbstractPaymentMethodType` class public function get_name() { return "other_payment"; }
public function is_active() { return true; }
public function get_script_data() { return $this->get_payment_method_data(); }
public function get_payment_method_script_handles() { return [ "wc-other-payment-gateway-block-checkout" ]; }
// This method can be used to pass data to your frontend. // For instance, if you had specific settings for your payment gateway, you could pass them here so they are available on page load. public function get_payment_method_data() { return [ 'id' => 'other_payment', 'title' => 'Custom Payment', ]; }
// The initalization method is the meat of the integration. This is where you enqueue your scripts and styles. // We also read in the auto-generated asset file to get the dependencies for our script. wp-scripts takes care of generating this for us when we run wp-scripts start or build. // And loaded up our gateway settings from the option table. public function initialize() { $this->settings = get_option( 'woocommerce_other_payment_settings', [] );
$script_dependencies = require __DIR__ . '/dist/wc-other-payment-gateway.asset.php';
wp_register_script( "wc-other-payment-gateway-block-checkout", trailingslashit( plugin_dir_url( __FILE__ ) ) . 'dist/wc-other-payment-gateway.js', $script_dependencies['dependencies'], '1.3.10', [ 'in_footer' => true ] ); wp_register_style( "wc-other-payment-gateway-block-checkout", trailingslashit( plugin_dir_url( __FILE__ ) ) . 'dist/style-wc-other-payment-gateway.css', [], '1.3.10' ); wp_set_script_translations( "wc-other-payment-gateway-block-checkout", 'woocommerce-other-payment-gateway' );
$this->maybe_enqueue_assets(); }
// This method checks if we should enqueue our assets. We only want to enqueue them on the checkout page. // You can modify this method to check for other conditions if you want to enqueue your assets only under certain circumstances to avoid customers loading them unnecessarily. protected function maybe_enqueue_assets() { if ( $this->should_enqueue_assets() ) { wp_enqueue_script( "wc-other-payment-gateway-block-checkout" ); wp_enqueue_style( "wc-other-payment-gateway-block-checkout" ); } }
private function should_enqueue_assets() : bool { $should_enqueue = ! is_order_received_page() && ! is_checkout_pay_page();
$is_cart_block_in_use = class_exists( CartCheckoutUtils::class ) && CartCheckoutUtils::is_cart_block_default(); $is_checkout_block_in_use = class_exists( CartCheckoutUtils::class ) && CartCheckoutUtils::is_checkout_block_default();
return $should_enqueue && ( wc_current_theme_is_fse_theme() || $is_cart_block_in_use || $is_checkout_block_in_use ); }}Hopefully the annotations in the code make it self explanatory, but to recap quickly what this class is doing.
- We’re creating a new block integration class which is going to be registered to the WooCommerce registry
- It extends the Blocks
AbstractPaymentMethodTypefrom WooCommerce - We added the abstract methods from the extended class with our own ID’s and data
- When the
initialize()function is called, we register the scripts and styles for our block integration based on the output of webpack that we configured in the previous step - Finally adding a little protection for customers to hopefully avoid some unnecessary loading
A quick note about coding standards.
I’ve purposefully left the code here as simple as possible and tried to match the style of the existing plugin so as not to look completely out of place.
It’s up to you to make sure you align with coding best practices and standards of your company or follow WordPress/PSR/Other standard. The code above could certainly be tidier and use utility functions to avoid repetition, so if you spot a point of improvement, go for it!
A quick recap so far
In this section we’ve setup the basic frontend tooling that let’s us start with the frontend coding. Node and pnpm should be up and running, and we’ve initalized a project package.json file to take care of installing our node dependencies. We also discussed the difference between SSL and non-SSL configuration when it comes to running the block scripts in your local WP instance.
You should be able to run pnpm dev now and see a similar output to:
> woocommerce-other-payment-gateway@1.0.0 start:hot> wp-scripts start --hot
<i> [webpack-dev-server] Project is running at:<i> [webpack-dev-server] Server: https://localwp.ddev.site:8887/<i> [webpack-dev-server] Loopback: https://127.0.0.1:8887/<i> [webpack-dev-server] Content not from webpack is served from '/home/simon/workspace/woocommerce-other-payment-gateway/public' directoryasset wc-other-payment-gateway.js 597 KiB [emitted] (name: wc-other-payment-gateway) 1 related assetasset wc-other-payment-gateway.asset.php 110 bytes [emitted] (name: wc-other-payment-gateway)Entrypoint wc-other-payment-gateway 597 KiB (570 KiB) = wc-other-payment-gateway.js 597 KiB wc-other-payment-gateway.asset.php 110 bytes 1 auxiliary assetruntime modules 32.6 KiB 15 modulesmodules by path ./node_modules/.pnpm/core-js-pure@3.38.1/node_modules/core-js-pure/ 132 KiB 127 modulesmodules by path ./node_modules/.pnpm/@pmmmwh+react-refresh-webpack-plugin@0.5.15_@types+webpack@...(truncated) 53.2 KiB 23 modulesmodules by path ./node_modules/.pnpm/webpack-dev-server@4.15.2_webpack-cli@5.1.4_webpack@5.94.0/...(truncated) 71.8 KiB 16 modulesmodules by path ./node_modules/.pnpm/webpack@5.94.0_webpack-cli@5.1.4/node_modules/we...(truncated) 5.17 KiB ./node_modules/.pnpm/webpack@5.94.0_webpack-cli@5.1.4/node_modules/webpack/hot...(truncated) 1.94 KiB [built] [code generated] ./node_modules/.pnpm/webpack@5.94.0_webpack-cli@5.1.4/node_modules/webp...(truncated) 1.73 KiB [built] [code generated] ./node_modules/.pnpm/webpack@5.94.0_webpack-cli@5.1.4/node_modules/webpack/...(truncated) 75 bytes [built] [code generated] ./node_modules/.pnpm/webpack@5.94.0_webpack-cli@5.1.4/node_modules/webpack/hot/l...(truncated) 1.43 KiB [built] [code generated]modules by path ./node_modules/.pnpm/html-entities@2.5.2/node_modules/html-entities/lib/*.js 78.9 KiB ./node_modules/.pnpm/html-entities@2.5.2/node_modules/html-entities/lib/index.js 4.84 KiB [built] [code generated] ./node_modules/.pnpm/html-entities@2.5.2/node_modules/html-entities/lib/named...(truncated) 73.1 KiB [built] [code generated] ./node_modules/.pnpm/html-entities@2.5.2/node_modules/html-entities/lib/numeric-...(truncated) 389 bytes [built] [code generated] ./node_modules/.pnpm/html-entities@2.5.2/node_modules/html-entities/lib/surr...(truncated) 583 bytes [built] [code generated]+ 7 moduleswebpack 5.94.0 compiled successfully in 539 msassets by status 597 KiB [cached] 1 assetasset wc-other-payment-gateway.asset.php 110 bytes [emitted] (name: wc-other-payment-gateway)Entrypoint wc-other-payment-gateway 597 KiB (570 KiB) = wc-other-payment-gateway.js 597 KiB wc-other-payment-gateway.asset.php 110 bytes 1 auxiliary assetcached modules 378 KiB (javascript) 32.6 KiB (runtime) [cached] 196 moduleswebpack 5.94.0 compiled successfully in 21 msGetting an error that your app.jsx file is not found?
Double check your output paths in your webpack config and make sure they match
your project layout. Did you remember to mkdir the client/src directory with
the app.jsx file inside?
We then switched back to our PHP backend, and added the initial template to get the block scripts registered and initalized there too. If you’ve got everything running correctly, you should be able to navigate to Checkout under a FSE/block theme and check the network tab to make sure the scripts are being loaded!
You will probably see a failure for the .css file as we have not yet added any styling. We will tackle that in the next steps.
So long as you’re not seeing any errors with webpack running (even if it isn’t doing anything!), and you see the scripts being loaded at checkout, then you’re good to move on. If not, pause here and do some Googling (or Chat Gippity) and get those resolved first.
You’re doing great, let’s keep going!
Let the frontend fun begin
Now we can get cracking on the fun part, messing around with our frontend code. What I like to do when adding an integration to an existing plugin is to have both the shortcode checkout and block checkout available in separate tabs so I can always go back and forth.
This just means, depending on when you created your local WordPress instance with WooCommerce, you might need to create a new page using either the legacy WooCommerce checkout shortcode or the WooCommerce checkout block.
In either case, make sure you are able to navigate to both in your browser, and we can get started on the next piece.
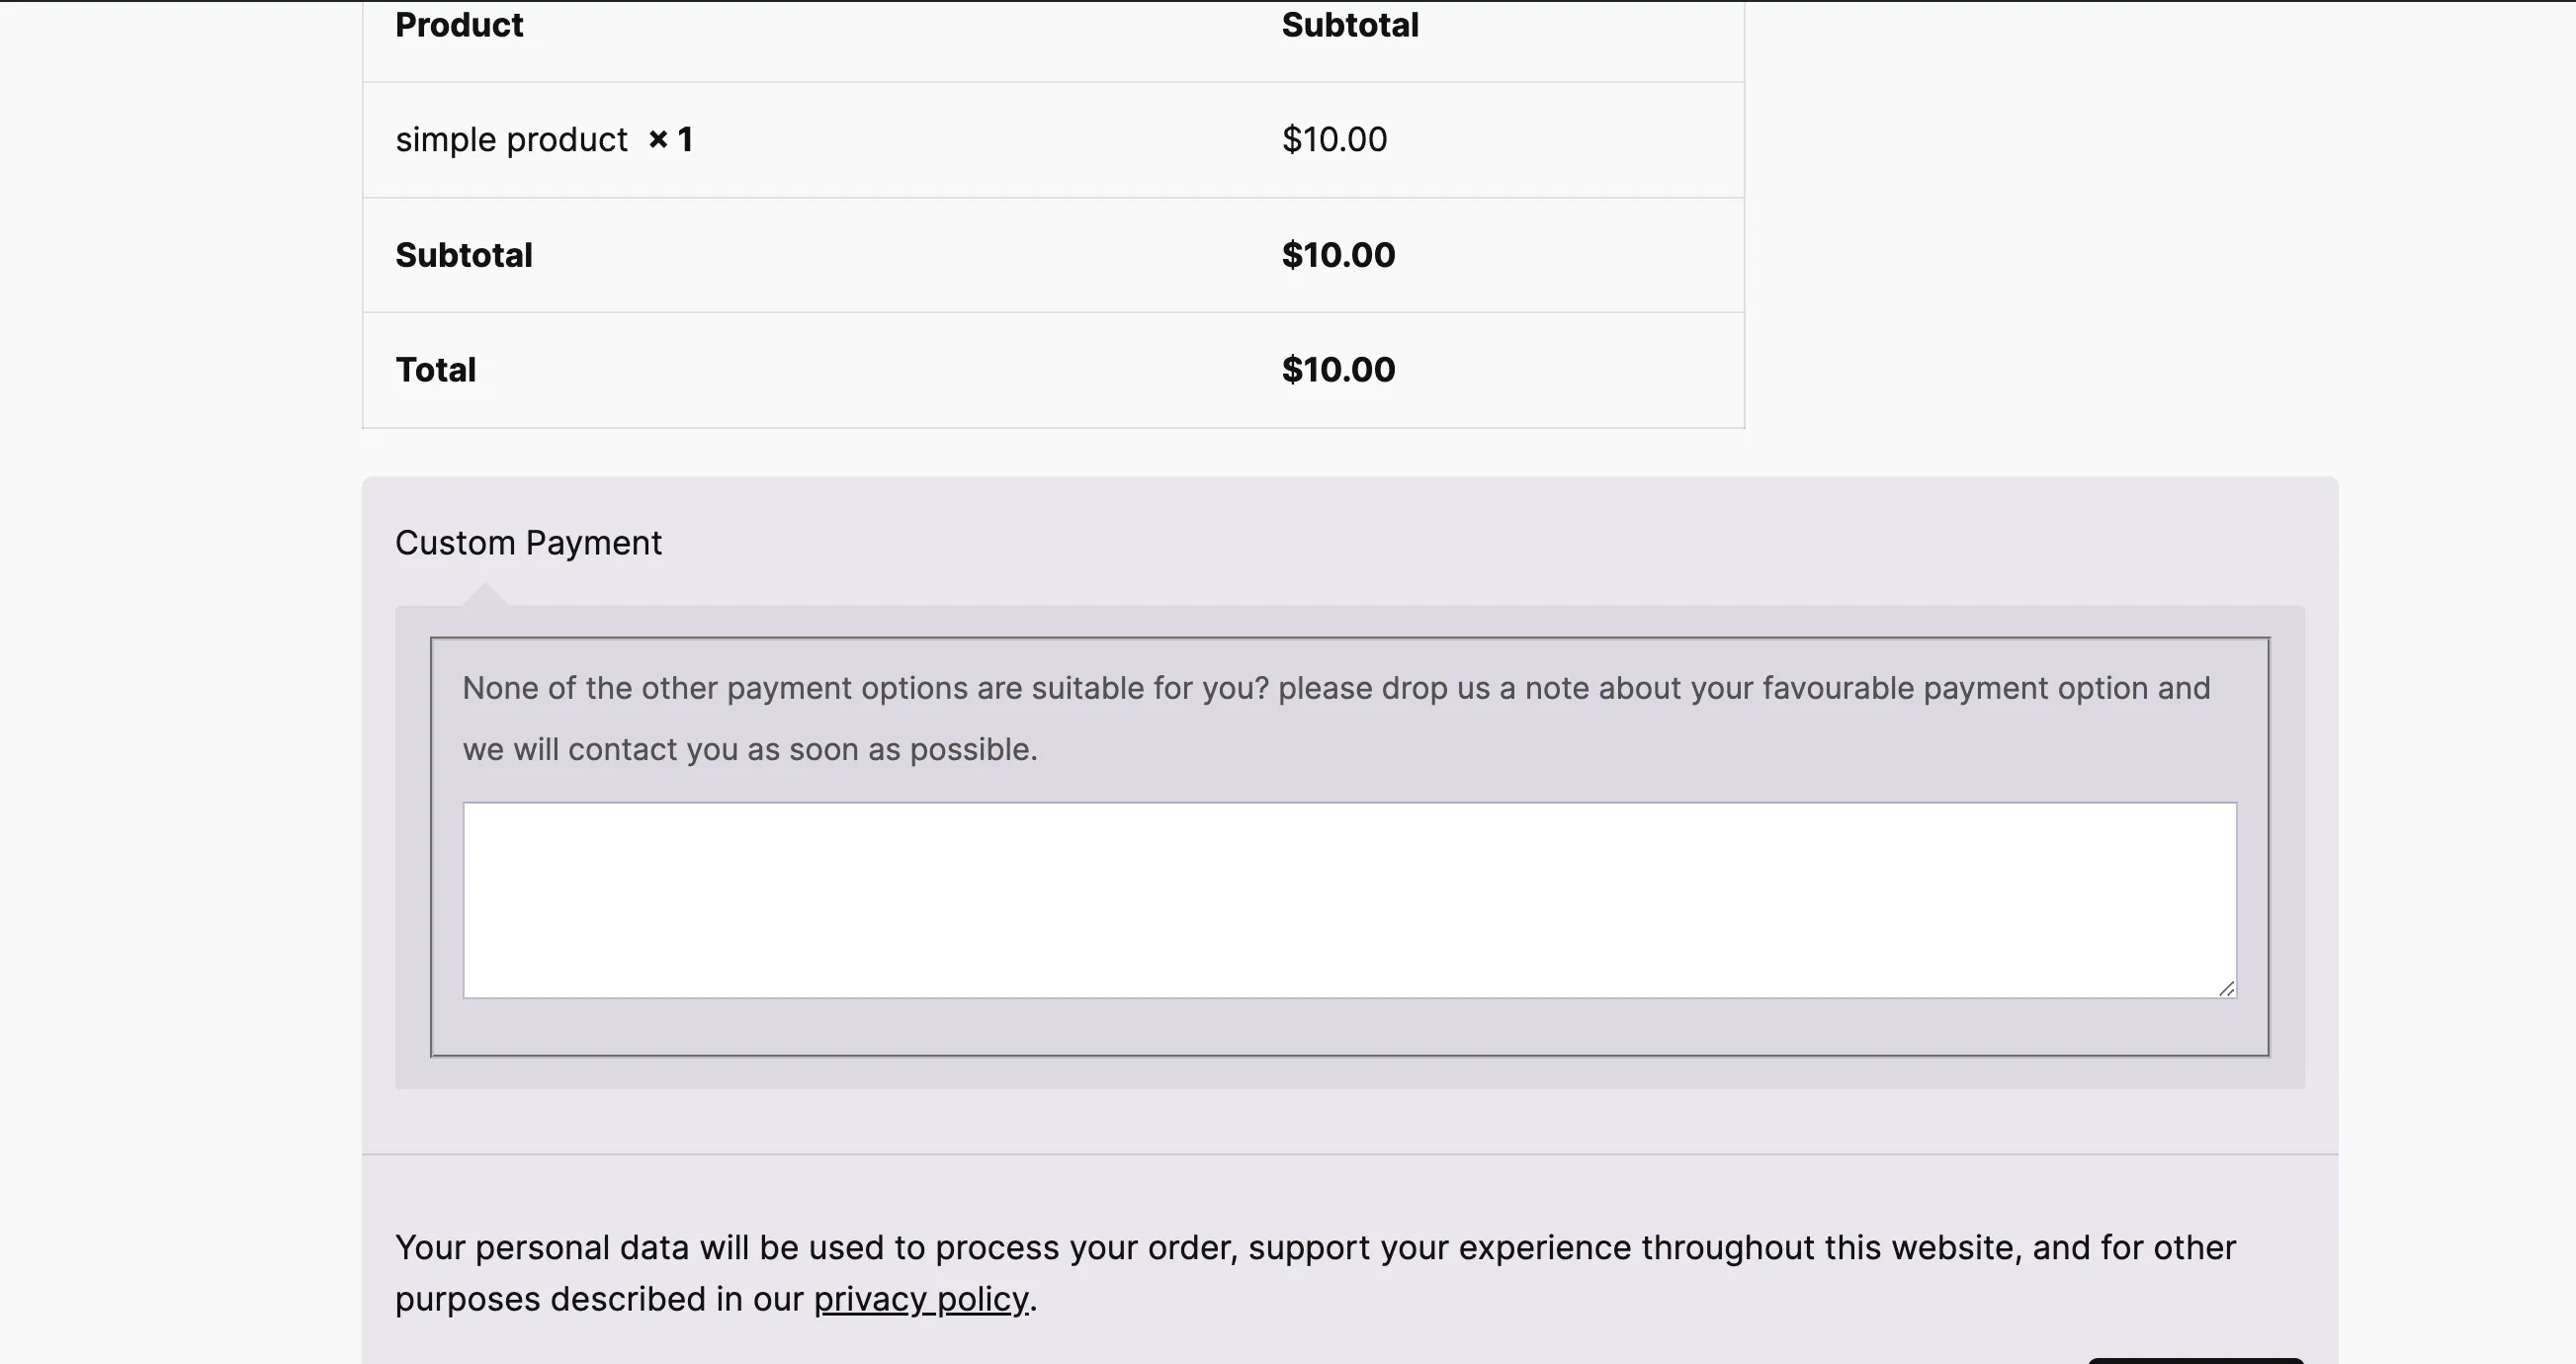
Here we have our other gateway plugin showing on the shortcode based checkout. This is the UI we’re going to want to replicate in React/blocks. Fortunately for us, this is fairly simple and consists of only a single textarea and label.
Registering the payment gateway
So while we’ve already registered the gateway under PHP and triggered the loading of the scripts, because WooCommerce renders the blocks at checkout via the frontend, we need to register the payment gateway on the frontend also.
We can add this to our app.jsx file we created earlier.
import { decodeEntities } from '@wordpress/html-entities'import { __ } from '@wordpress/i18n'import { PaymentMethod } from './components/payment-method'import { registerPaymentMethod } from '@woocommerce/blocks-registry'import { getPaymentMethodData } from '@woocommerce/settings'
export const otherGatewaySettings = getPaymentMethodData('other_payment')const gatewayTitle = otherGatewaySettings?.title || __('Custom Payment', 'woocommerce-other-payment-gateway')const gatewayName = otherGatewaySettings?.id || 'other_payment'
registerPaymentMethod({ name: gatewayName, label: ( <div> <span className='wc-block-components-payment-method-label'> {gatewayTitle} </span> </div> ), content: <PaymentMethod />, edit: <PaymentMethod />, canMakePayment: () => true, ariaLabel: decodeEntities(gatewayTitle), supports: { features: ['products', 'subscriptions'], showSavedCards: false, showSaveOption: false }})If you’re brand new to React/JS then some of this might look a little strange, but hopefully it’s not completely unreadable. There’s a few things happening here in order to set up the gateway.
import { registerPaymentMethod } from '@woocommerce/blocks-registry'import { getPaymentMethodData } from '@woocommerce/settings'Firstly, we need to use the WooCommerce functions registerPaymentMethod and getPaymentMethodData. These are available globally on the window object as part of the wcBlocksRegistry and wcSettings objects, respectively.
The WooCommerce dependency extraction plugin we added searches through our code for any import statement targeting an @woocommerce module and adds it to the PHP script dependencies. Essentially, the import acts as an alias. If you want to import directly, or aren’t using the Webpack plugin, you can access the functionality via the global window object instead.
import { PaymentMethod } from './components/payment-method'We’re also importing a component to be used for our edit and save components (explained below), but we haven’t created this yet. Go ahead and create a new components directory with the payment-method.jsx file. We’ll add the contents for this in a little bit.
export const otherGatewaySettings = getPaymentMethodData('other_payment')const gatewayTitle = otherGatewaySettings?.title || __('Custom Payment', 'woocommerce-other-payment-gateway')const gatewayName = otherGatewaySettings?.id || 'other_payment'We then use the getPaymentMethodData function to grab the current gateway
settings. (hint: these are the values we passed through from the backend in the
previous step!). We export this constant so we can reuse it in other files without needing to re-request it from the function. Ultimately, it loads from a script tag on the page.
So retriggering the function isn’t going to cause performance degradation either, I just find it easier to do the import.
Finally, we set a default gateway name that we can fall back on in case the backend doesn’t provide it (which it currently doesn’t, but we can fix that later!).
registerPaymentMethod({ name: gatewayName, label: ( <div> <span className='wc-block-components-payment-method-label'> {gatewayTitle} </span> </div> ), content: <PaymentMethod />, edit: <PaymentMethod />, canMakePayment: () => true, ariaLabel: decodeEntities(gatewayTitle), supports: { features: ['products', 'subscriptions'], showSavedCards: false, showSaveOption: false }})Now we get to the main part of the app file, where we call the
registerPaymentMethod function to
register the block gateway
with WooCommerce. These values are described on the WooCommerce docs, but the
interesting ones to mention here are the content, edit, and label
properties.
The label property takes a React element and is rendered next to the radio button at block checkout. We’re just wrapping the settings title, or default title, in a span, which itself is wrapped in a div with the appropriate classes from WooCommerce.
What’s interesting though is that when WooCommerce renders this component, it
passes through some additional props, one of which is the components
object which contains some handy components you could use instead. Specifically,
as you can read in the docs, the PaymentMethodLabel and PaymentMethodIcons
components that you could use here instead.
If you wanted to get fancy, you could pause here and create your own React component that uses these components which would allow you to pass through a list of cardIcons, icon, and text. You could then import this in your app file to use for the label property. You can also reuse this custom component for future projects.
For the content and edit props we’re using the same component,
<PaymentMethod />, just for ease of use. content would be what gets
rendered for the customer to see at checkout, and edit is what’s
shown in the admin site editor when editing the checkout page.
Since there’s no difference between the two in our case, we can use the same
component for both.
Importing plugin settings
So now we have our app running, we need to add some of the plugin settings so that we can control the block UI in the same way the shortcode checkout works.
Specifically, we’re looking to grab the merchant configured payment gateway name, the message, whether the text is required, or if the text field should show at all. (we’re not concerned about the order status, as this will still be handled by the backend.)
Remember when we setup the get_payment_method_data() function earlier? We need to go back there and
pass over these plugin settings now.
public function get_payment_method_data() { return [ 'id' => $this->get_setting('id', 'other_payment'), 'title' => $this->get_setting( 'title', 'Custom Payment'), 'description' => $this->get_setting( 'description' ), 'text_box_required' => $this->get_setting( 'text_box_required' ), 'hide_text_box' => $this->get_setting( 'hide_text_box' ), ]; }Here we’re passing over the plugin settings that are relevent for the frontend. As our
previous implementation of the AbstractPaymentMethodType class initialized our settings
for us (by calling get_option() in the initialize() function), we can call get_setting()
in order to grab the settings from the database option.
You can test whther this is working before changing any frontend code by running a console.log statement in your browser’s console window:
console.log({ settings: window.wc.wcSettings.allSettings.paymentMethodData.other_payment })// which currently gets us:{ "id": "other_payment", "title": "Custom Payments", "description": "None of the other payment options are suitable for you? please drop us a note about your favourable payment option and we will contact you as soon as possible.", "text_box_required": "yes", "hide_text_box": "yes"}We can now use these settings together with our frontend UI!
Updating the frontend ui
We’ve already pre-emptively added our title and description, so there’s no need to update that in our code. It should now work as expected rather than falling back to the defaults we provided.
Go ahead! Try changing the settings in the plugin payment settings page in wp-admin and reload the block checkout.
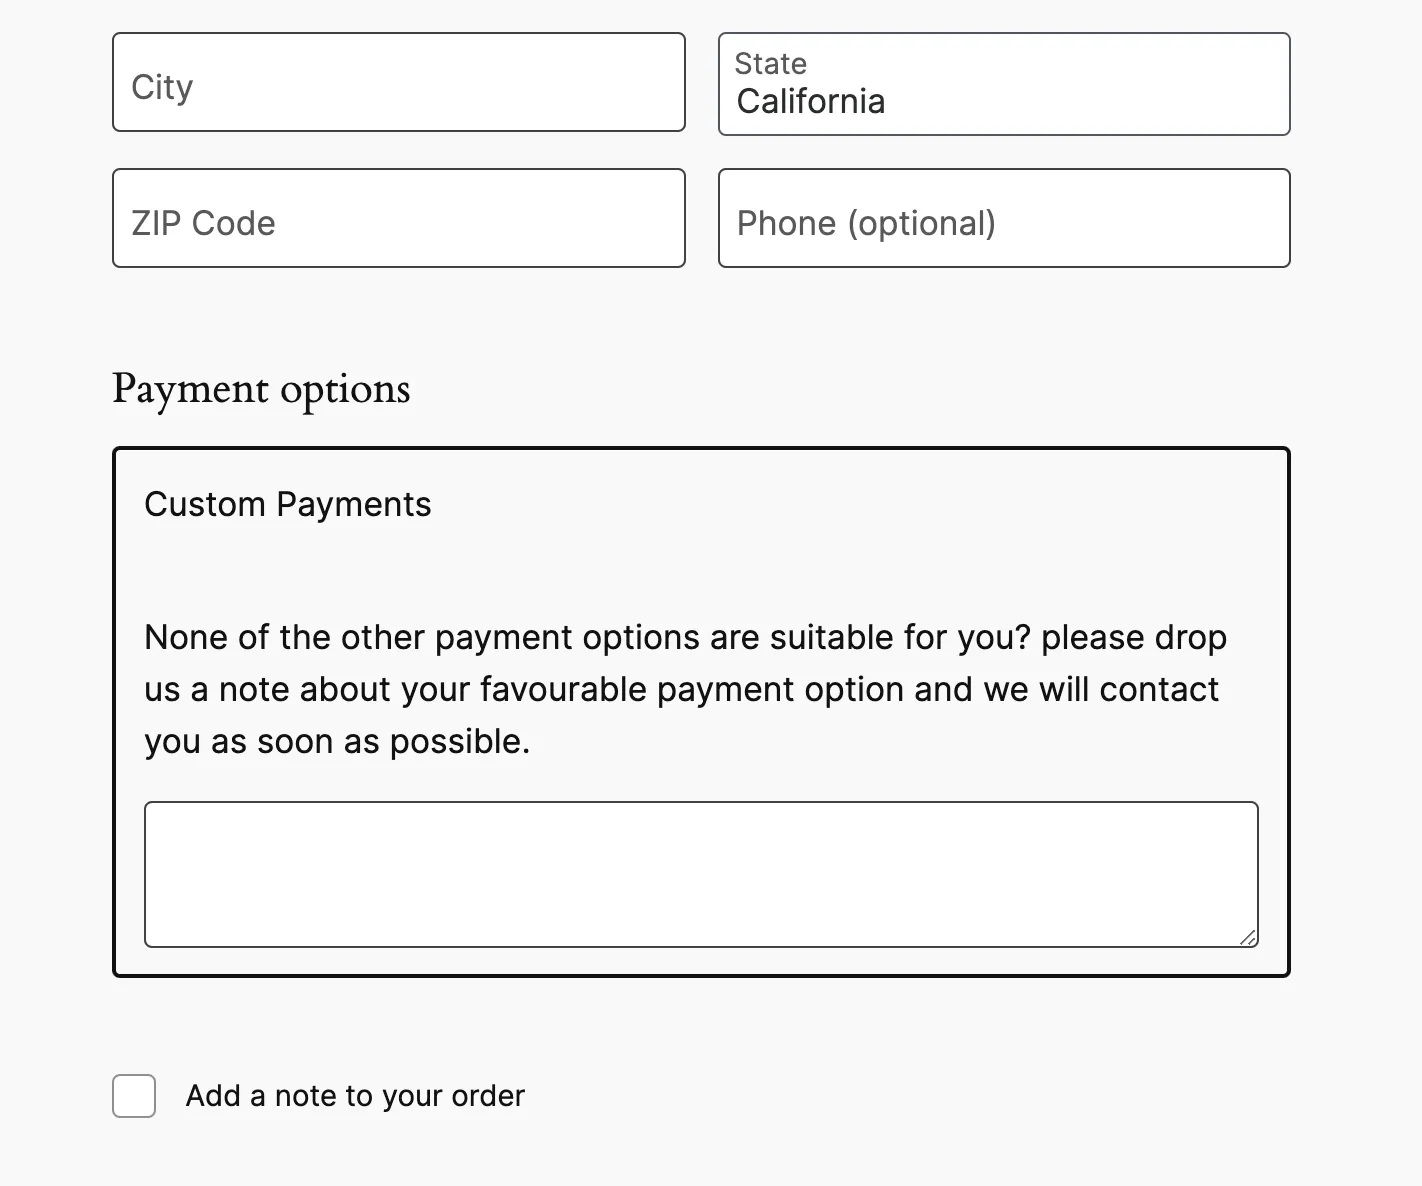
We can now add the rest of the components to match the shortcode checkout. Reviewing the shortcode checkout in our other browser tab, we need to add the description, and the input box that is only shown when hide_text_box is “no”. So let’s add that quickly to our payment-method component we added earlier:
import { otherGatewaySettings } from '../app'import { Textarea } from '@woocommerce/blocks-components'import { useState } from '@wordpress/element'
export function PaymentMethod() { const [paymentNote, setPaymentNote] = useState('')
return ( <div> <p>{otherGatewaySettings?.description}</p> {otherGatewaySettings?.hide_text_box === 'no' ? ( <Textarea value={paymentNote} onTextChange={setPaymentNote} /> ) : null} </div> )}We’re setting up state to store the note for later use and importing WooCommerce’s Textarea component, using the alias that the webpack extract plugin handles for us.
Next, we use the description from the settings and conditionally render the textarea based on whether it’s enabled in the plugin settings (i.e., when it’s not hidden).
At this point, you should have the UI in place!
But we’re not done yet! Unfortunately, the Textarea component doesn’t support required, so we’re going to have to add that feature another way and we also need to handle the payment processing with our gateway too.
While we’re here, we can also add CSS support to our plugin. While this plugin won’t need any real styling, feel free to go as nuts as you like with your own. We’ll set up the files just to show how it’s done.
Back in our app.jsx file, add a new import for your stylesheet:
import { decodeEntities } from '@wordpress/html-entities'import { __ } from '@wordpress/i18n'import { PaymentMethod } from './components/payment-method'import { registerPaymentMethod } from '@woocommerce/blocks-registry'import { getPaymentMethodData } from '@woocommerce/settings'import './style/style.css'
25 collapsed lines
export const otherGatewaySettings = getPaymentMethodData('other_payment')const gatewayTitle = otherGatewaySettings?.title || __('Custom Payment', 'woocommerce-other-payment-gateway')const gatewayName = otherGatewaySettings?.id || 'other_payment'
registerPaymentMethod({ name: gatewayName, label: ( <div className='tw-flex tw-w-full tw-place-content-between tw-items-center tw-mr-12px'> <span className='wc-block-components-payment-method-label'> {gatewayTitle} </span> </div> ), content: <PaymentMethod />, edit: <PaymentMethod />, canMakePayment: () => true, ariaLabel: decodeEntities(gatewayTitle), supports: { features: ['products', 'subscriptions'], showSavedCards: false, showSaveOption: false }})And make sure to create the style directory with the style.css file inside. We can add some sample CSS to it just so webpack generates us a file, and we solve the 404 error we were seeing earlier:
.wc-block-components-payment-method-label { font-weight: 700;}Give that a try! Restart your webpack server if required, and give the block checkout a reload.
Handling the hooks
Hooks are a React feature for composing reusable logic. React comes with many built-in hooks, some of which you’ve already seen in our code for storing state, while others trigger when certain state changes.
Our payment gateway logic is no different. WooCommerce provides us some hooks we can use in order to register our gateway for certain events, as described in their event workflows.
Since our requirements are simple, we’ll focus on using onPaymentSetup() - which triggers after the customer
selects the Place Order button. (while there other events are fired first, we don’t need to handle them.)
Let’s take a look at the code that works first, and then we can step through it.
import { otherGatewaySettings } from '../app'import { Textarea } from '@woocommerce/blocks-components'import { useEffect, useState } from '@wordpress/element'import { __ } from '@wordpress/i18n'
export function PaymentMethod({ eventRegistration, emitResponse }) { const [paymentNote, setPaymentNote] = useState('')
const { onPaymentSetup } = eventRegistration useEffect(() => { const unsubscribe = onPaymentSetup(() => { if (!paymentNote && otherGatewaySettings?.text_box_required) { return { type: emitResponse?.responseTypes?.ERROR, message: __( `Please let us know what payment options you'd prefer`, 'woocommerce-othr-payment-gateway' ), messageContext: emitResponse.noticeContexts.PAYMENTS } }
return { type: emitResponse?.responseTypes?.SUCCESS, meta: { paymentMethodData: { [`${otherGatewaySettings?.id}-admin-note`]: paymentNote } } } }) return unsubscribe }, [onPaymentSetup])
return ( <div> <p>{otherGatewaySettings?.description}</p> {otherGatewaySettings?.hide_text_box === 'no' ? ( <Textarea value={paymentNote} onTextChange={setPaymentNote} /> ) : null} </div> )}First, we’re importing the internationalization function, __(), which
should be familiar if you’ve worked with WordPress before. All of WordPress’ usual i18n
functions are available in this package too.
Next, we need to destructure the eventRegistration and emitResponse from the component’s props.
By default, WooCommerce passes these props to your components when you register your
payment gateway. There’s a whole host of other properties you can use too! Why don’t you try
replacing the destructured props with just the word props and console.log them to see
what’s available?
The eventRegistration prop gives us access to the WooCommerce events we mentioned earlier.
Specifically, on line 9, we destructure the onPaymentSetup() registration function for our
gateway to use.
The emitResponse prop gives us acces to a few different constants that we can use when building our reply, whether a success or error message, and where the error should be displayed.
From lines 12-21, we’re adding the functionality for our required note on the textarea. If the plugin settings enforce a note here, we check if the stored state (paymentNote which is updated when the user types into the field) is empty, and if so we immediately return an error with an error message and messageContext.
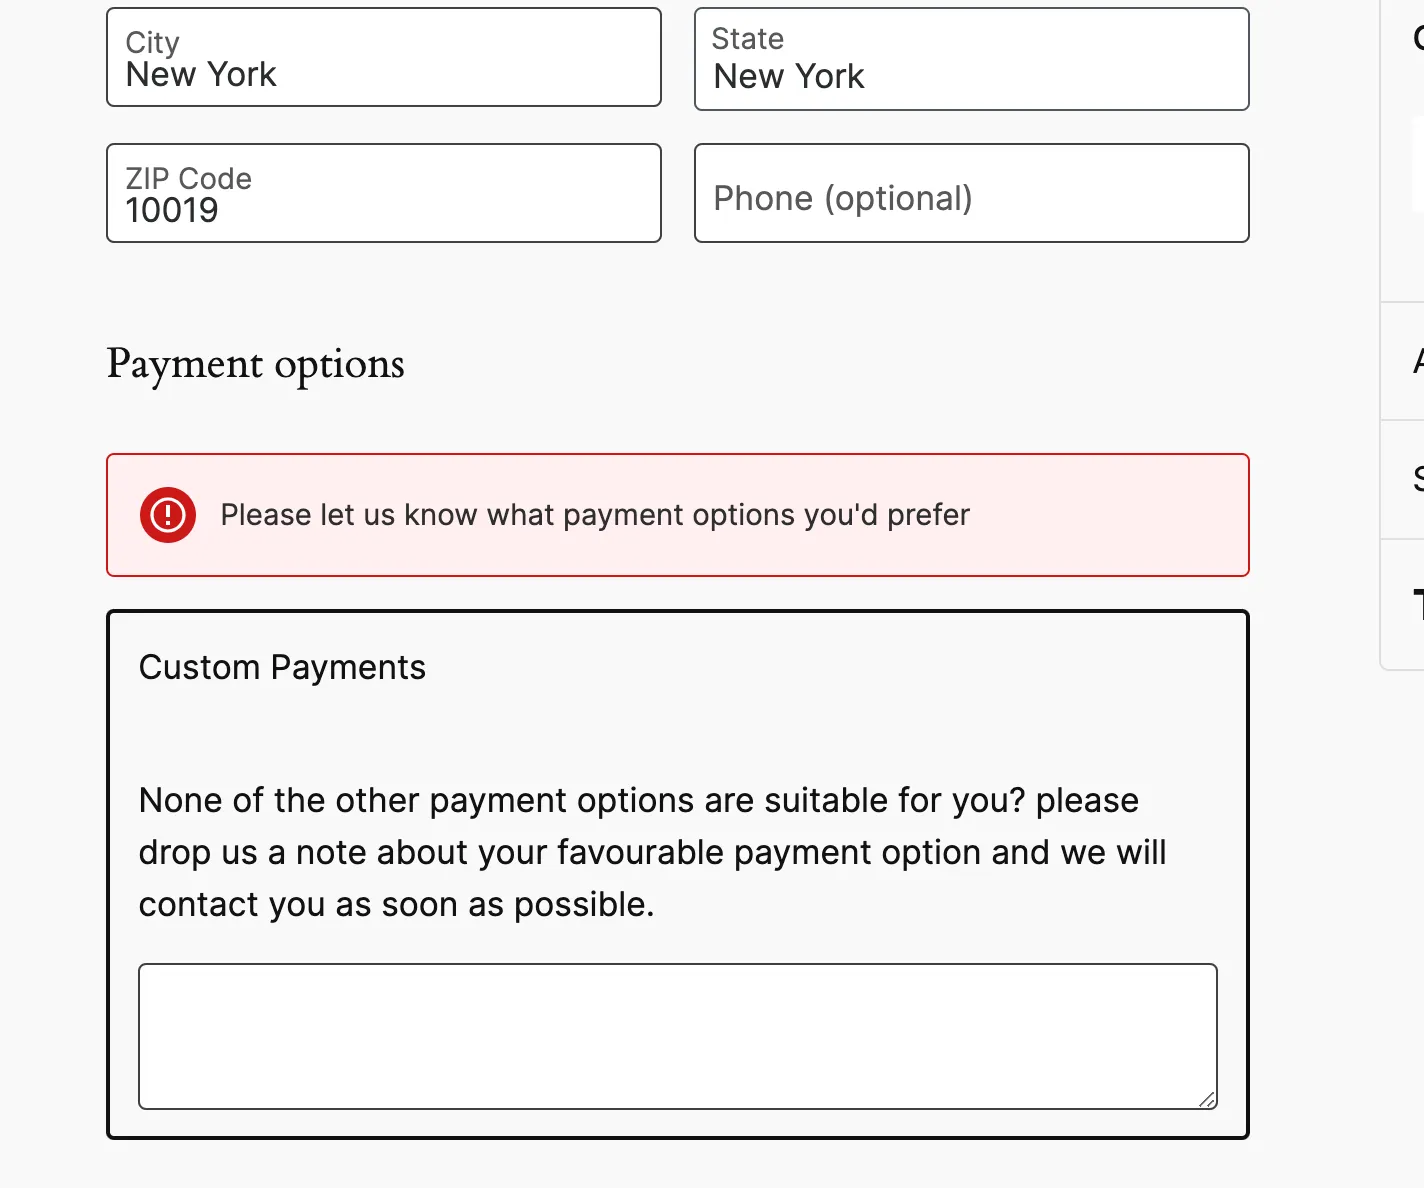
The error message uses the i18n function (__()), so when the plugin is built, the message will
be included in the generated .pot file. The messageContext prop lets us tell WooCommerce where
to put the error message, in this case, above the payment form closer to where our input is. Otherwise
it appears at the top of the checkout page.
This can be a nicer UX for the customers, as they know to correct the field immediately below it.
One limitation of this basic implementation is that it doesn’t indicate which field is causing the error. A more polished solution would involve adding error styling to the textarea and using relevant ARIA labels for accessibility.
Why not give it a try? You could store an error state and reset it after the user starts typing.
Finally, on lines 23-30, we send back a success response, allowing the checkout process continue. We also include the customer note in the payment data, which can be processed by the backend.
It’s important to note that we need to use the same object property that the shortcode checkout would use, so the existing
process_payment() function still works accordingly.
If you’re unsure what this is from reading the PHP code, you can open up the network page on the shortcode checkout.
Make sure that preserve log is enabled, and then submit a successful order.
You will see a request to ?wc-ajax=checkout that has the payload that lists all the fields that the gateway is
sending to the backend that you can then replicate for your block support.
At this point, if you try and place the order via blocks checkout, you should be blocked from continuing if the note field is empty and the plugin has it required, and the order should be placed successfully and the note added to the order viewable in admin otherwise!
Congrats! 🎉 If you made it this far, give yourself a pat on the back.
Wrapping up
Building with WooCommerce blocks comes with its own set of challenges, especially since WooCommerce handles cart and checkout pages differently than the traditional shortcode approach. If you’re coming from a PHP background, the shift to JavaScript (and all the associated tooling) may feel steep. However, as we’ve seen in this tutorial, the code itself isn’t overly complicated—the main challenge lies in figuring out what functions are available and how to access them.
For you TypeScript developers out there, welcome to chaos. Unfortunately a lot of the types you need to access are not exported from any package, and working with the webpack extraction plugin and alias imports makes it a real pain. Even for those types you do have, you might find they aren’t tight enough to be worth while (lots of any’s!).
All that said though, there’s plenty of helpful folks in the WooCommerce community Slack (I’ll be there, come say hi! 👋), and if you Google hard enough you’ll likely find what you need on Github.
Good luck!